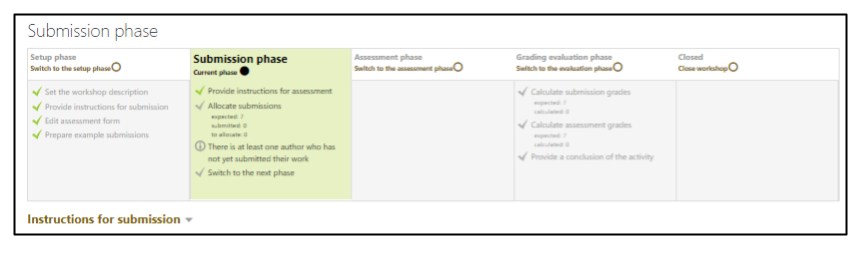
A Moodle workshop is moved to the Submission phase once it has been prepared for submissions from the settings page and in the Setup phase.In this phase, instructors will see the checklist, as well as a list of participants and their submission status. The checklist consists of only three linked items: Provide instructions for assessment (in case this wasn't done in the previous two steps), Allocate submissions to distribute the work of assessing, and Switch to the next phase. The Workshop submissions report is a quick overview of how many have/have not submitted, and who submitted when.

Allocating submissions
Submissions can be distributed to participants for assessment either automatically or manually.
Automatic (Scheduled) Allocation

If you indicated a Due Date in the Availability section of the workshop settings for submissions, you will be able to schedule automatic random allocation to occur once that date is reached. If you have done this, your workshop will automatically randomly assign submissions for assessment once the deadline is reached, using the settings in the Scheduled allocation tab of the allocation page.This is most often combined with setting the workshop to automatically move to the Assessment phase once the submission deadline has arrived. (Note: Until you are familiar with how allocation works, it is recommended to use one of the manually-created allocation methods below, as the random allocation method can lead to unexpected results if not set up correctly. )
To set this up at any time during the Submission phase, do the following:
- Click on Allocate submissions from the Submission phase checklist.
- From the allocation pages, select the Scheduled allocation tab.
- Check Automatically allocate submissions at the end of the submission phase. Until you click on Save changes, Current status will read Scheduled allocation disabled. After saving, the Current status will read To be executed on _deadline date_. (If no deadline has been set for submissions, you will see Unable to automatically allocate submissions. Workshop does not have the submissions deadline defined after saving. To rectify this, return to the workshop settings page and enable and set a submissions deadline.)
- Expand the Allocation settings section.
- Set how many assessments will be done under Number of reviews. This can be set either to per submission, meaning each submission will have that many reviews, or per reviewer, which indicates each participant will do that many reviews (meaning that depending on numbers, some submissions may have more reviews).
- Optionally set whether Participants can assess without having submitted anything (by default, only those who have submitted will be assigned something to assess). If the Group mode in the workshop settings is set to Visible groups, you can optionally Prevent reviews by peers from the same group (If you want to keep reviews within a group then set the workshop to Separate groups). Finally, if you have already allocated some submissions, you can choose to add to or Remove current allocations.
- Finally, click on Save changes to complete your setup.You will receive the following notice: Scheduled allocation enabled. As the allocation won't take place until the deadline is reached, you won't be able to see (or modify) the allocation table until that time.
Manually-created (Manual/Random) Allocation
If you have not defined a submission deadline, or if you wish to be able to review the created allocations before releasing them to participants, then you will want to use one of the two manually-created allocation methods. You have the option of Manual allocation, or creating all the assessment allocations one-by-one by hand, or Random allocation, specifying how Moodle should create the allocations, with the option to view, re-allocate, or edit the allocation afterwards. As allocations can only be set for submissions already received, you will want to wait until all the submissions have been uploaded, or the submission end date has been reached.
Manual Allocation
To assign allocations one-by-one for a custom allocation, do the following:
- Click on Allocate submissions from the Submission phase checklist.
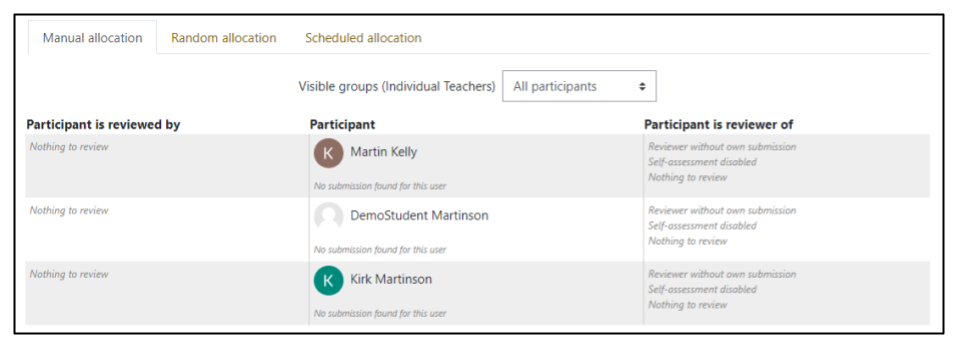
- You will be presented with a table of participants with three columns: Participant is reviewed by, Participant, and Participant is reviewer of. The first and last columns have drop-down lists for each participant. Each drop-down list will list all of the submissions not from that participant. The first column will determine who will assess the submission of that participant, and the last will specify which users they will assess.
- If the workshop is set up to run with Visible or Separate groups, you will have the option to show all participants, or only those from one of the groups. Note: if only one group is shown, the drop-down lists will still list all participants, not just those from the displayed group.
- For each participant, choose at least 1 name from each drop-down list. After selecting a name, you will see a confirmation showing the two participants affected (the reviewer and the reviewee). Click on Show all participants to return to the full table.
- You may remove a participant from either column by clicking on the trash can icon next to their name.

Random Allocation
If you do not wish to assign all of the allocations one-by-one, you can use the Random allocation option, which will assign participants randomly based on your settings. This can be done and then manually edited, or repeated until a desired result is achieved. To do so, follow these steps:
- Click on Allocate submissions from the Submission phase checklist.
- Select the Random allocation tab.
- Set how many assessments will be done under Number of reviews. This can be set either to per submission, meaning each submission will have that many reviews, or per reviewer, which indicates each participant will do that many reviews (meaning that depending on numbers, some participants may be assigned more reviews than others, or, alternatively, some submissions may have more reviews than others).
- Optionally set whether Participants can assess without having submitted anything (by default, only those who have submitted will be assigned something to assess). If the Group mode in the workshop settings is set to Visible groups, you can optionally Prevent reviews by peers from the same group (If you want to keep reviews within a group then set the workshop to Separate groups). Finally, if you have already allocated some submissions, you can choose to add to or Remove current allocations.
- Finally, click on Save changes to complete your setup. You will be shown a list of allocations made (and optionally those removed), and any notices, such as if you have tried to allocate more reviews than there are submissions or participants. Click Continue to return to the allocation page. (Note: you will be returned to the Random allocation page showing the default settings - don't panic!)
- Click on the Manual allocation tab to review the allocations that you just created. Depending on your settings, you may find that you want to edit or re-create your allocation table (e.g. each submission is to receive 3 reviews, but some participants have been give 4 to assess, and others 2). In this case you may edit the allocations manually, or re-run the allocation (with Remove current allocations) until you achieve the desired results.
- Click on the name of the workshop in the breadcrumb links below the course title at the top of the page to return to the Submission phase page.

If you have not set the workshop to automatically advance to the next phase after the submission deadline, you will need to click on Switch to the next phase from the Submission phase checklist to open the workshop to participants for assessment. After clicking the link, you will be asked to confirm your decision to advance the phase, and then you will be presented with the Assessment phase view. Once this is done, participants will be able to access the page and see the assessments assigned to them.
Continue to the Assessment phase.