The workshop activity in Moodle can be a helpful and effective tool in having students evaluate each others' work and to help them focus on the process of creating a paper or project and on the criteria set forward in the rubrics to assess them. Although the workshop module can seem daunting at first to set up, it handles the complexities of sharing student papers (anonymously) with multiple participants, and removes a large amount of work from the instructor once the setup is complete.
Creating the Workshop activity
Adding Workshop and Initial Setup
- Navigate to the section/tile where you want to add the activity and click on Add an activity or resource, and then choose Workshop.
- Once the workshop settings page opens, enter a title for Workshop name and provide a Description of the overall activity. There will be places to describe each step of the process further down in the workshop settings as well.
- Choose the Grading strategy. Rubric is the likely the most common, but there are 4 methods available:
- Accumulative grading - In this scheme, each of a set of criteria are assigned a grade and a weight. Grading type for each criterion can be set separately, ie. 100 pts., Pass/Fail scale, 20 pts.
- Comments - Not technically graded, this strategy always awards 100%. This allows for a set of comments in defined criteria. Generally used for first draft assessments, where the workshop is then reset to the submission phase for a revised submission based on the comments.
- Number of errors - Each criteria in this scheme can be assigned a pair of pass/fail words (eg. Yes/No, Present/Missing, Good/Poor...) and a weight. Each error or 'fail' grade is multiplied by its weight and subtracted from the total of the weights to give a percentage (ie. one error weighted 2 out of three criteria with weights 2, 2 and 4 [a total of 2+2+4 =8] would result in 8-2 / 8 or 6/8 = 75%).
- Rubric - The standard set of criteria, each with a range of descriptive levels and a point value. The total grade is calculated as the sum of points earned minus the minimal grade, divided by the sum of total possible points minus the sum of minimum grades. Note: this means that is always recommended to have a 0 grade option in the rubric to have grades calculated as normally expected (ie. a 4 on a scale of 2-5 is worth 4-2 / 5-2 = 2/3 or 66%, and not 4/5 = 75%).
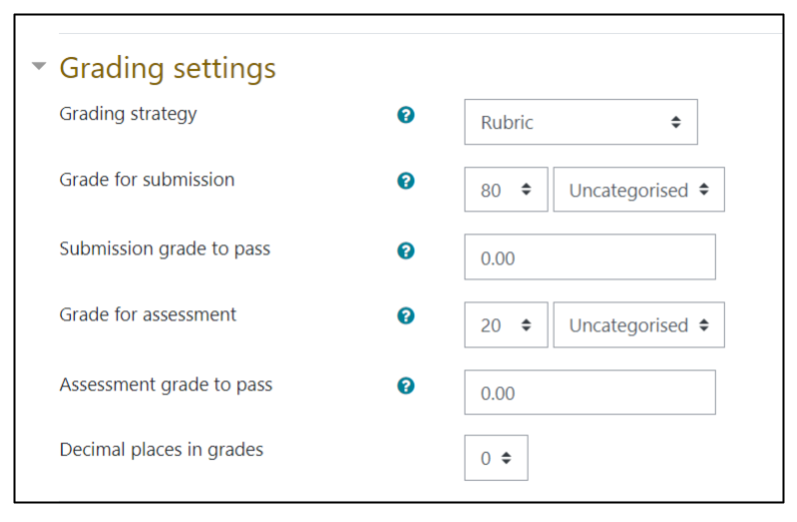 Set the Grading settings. There are two (possible) grades assigned to each student for the workshop: the Grade for submission for their actual submitted work (paper, podcast, video, etc.), and the Grade for assessment, which rates the accuracy or validity or their assessment of their fellow students. The sum of these two grades should add up to the total possible points for the assignment. As with other assignments, you can optionally choose to set the Grade to pass. Each of these grades will be passed to the gradebook, as opposed to one overall grade.
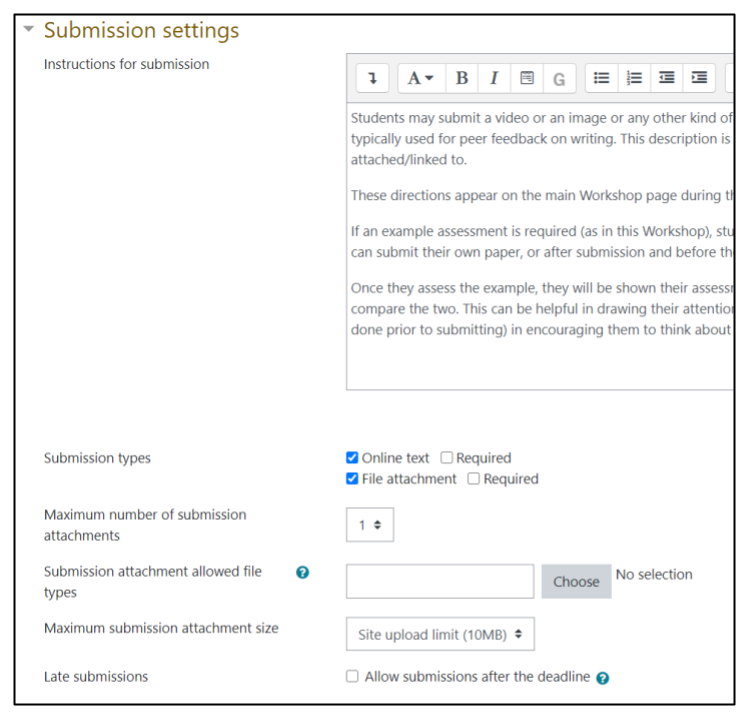 After choosing the grading type, expand the Submission settings. In this section you can specify the directions for what the submission should be, explain what the criteria for the assignment are, and what type of file submission is accepted. As with regular Moodle assignments, students can enter text directly into the assignment, or they can upload any of Moodle’s accepted file types. Audio and video submissions can be embedded into or linked from the text editor (preferred, to reduce storage on the Moodle server) or uploaded into the text editor or as an attached file.You can also specify if Online text or a File attachment, or both, are Required. Additionally, you can specify which file types students may upload (.pdf, .mp4, .jpg, etc.), the maximum file size and whether Late submissions will be accepted.
 Next are the Assessment settings, where directions for the peer assessment can be entered. You may also check Students may assess their own work, allowing students to be either specifically or randomly assigned their own work to assess (this is off by default). The assessment form to be used will be added during the Setup phase.
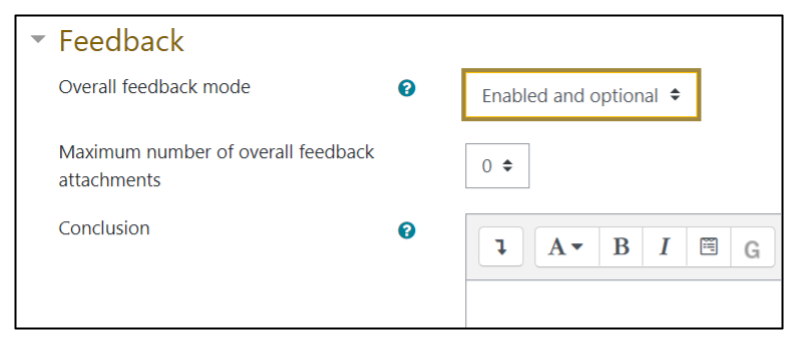 Under Feedback, you can specify the Overall feedback mode, which sets student reviewer feedback is Enabled and required, Enabled and optional, or Disabled. If this is enabled, a text box will appear below the assessment, allowing (or requiring) reviewers to leave text feedback or explanation of their assessment. You may also specify whether feedback attachments may be uploaded, and the maximum number of files that can be uploaded. Finally, in the Conclusion field, you can provide standard final feedback text for all students that will be displayed at the end of the workshop activity, often describing how to access the assessments and submission grades after the completion of the activity.
 The final workshop-specific setting is for Example submissions. Here is where you can specify whether an example submission (paper, video, audio recording, etc.) will be provided for students to reference and assess. If an example submission is provided, assessment of the example can be set to voluntary, or mandatory. If you wish students to rate the sample, but do not want them to view the sample submission until after they have submitted their own work, then choose Examples are available after own submission and must be assessed before peer assessment. If you would like them to view and rate the sample as a example of what to submit, then select Examples must be assessed before own submission. When students complete an example assessment, they will then be shown an example rating of how their assessment matched the provided assessment of the example submission. This rating is to help them calibrate their subsequent ratings of their peers, and will not contribute to their overall workshop grade.
- Under Availability, you can optionally the turn on the standard Moodle setting of when assignments/submissions can first be turned in, and the deadline for submission. If a deadline for submissions is set, you can also optionally set the workshop to automatically Switch to the next phase after the submissions deadline. This will move the workshop into the Assessment phase once the submissions deadline is passed. If this is not turned on, you will simply have to manually trigger the next phase. Additionally, you can also activate opening and closing dates for the Assessment phase of the workshop.
- Standard Moodle activity settings, such as Restrict access, Activity completion and Group mode (under Common module settings) can also be set here.
- After finalizing all the settings above, click Save and return to course, or Save and display to continue setting up the workshop.
Anonymous Reviewing
If you do not wish participants to be able to see the name of the author of the submissions they are grading, you'll need to change the permissions for the activity. To do this, you'll need to:
- Click on the workshop settings wheel in the upper right corner, and choose Permissions.
- Scroll down to View author names and click on the trash can icon after Student. Changes are saved immediately. You can now return to the main workshop page.
Continue to the Main Activity Page and Setup phase.
Skip to the Submission phase.
Skip to the Assessment phase.
Skip to the Grading evaluation phase.