Clicking on the Moodle workshop from the course page, or selecting Save and display from the settings page will lead to the main workshop activity page. The workshop activity consists of the following five phases that are (primarily) manually switched by the instructor. Most phases contain a checklist of items showing what has been/needs to be done to complete the phase. It is always possible to step back through the phases in the process, if necessary.
- Setup phase - Includes providing descriptions for the overall workshop and for the submission of the assignment (if not already entered during workshop creation), creating the assessment form, and providing and assessing an optional example submission.
- Submission phase - Includes providing a description of the submission criteria (if not already entered in previous steps) and setting up the allocation of submissions to participants for assessment.
- Assessment phase - In the assessment phase, there are no steps for the instructor to take, other than advancing to the next step once participant assessments have been completed.
- Grading evaluation phase - During this phase, the settings for how the assessment ratings are graded can be set, and a conclusion, or final feedback to all participants, can be given, if not entered already during workshop creation.
- Closed - Once the assessments have been graded, switching to the closed phase will post the grades from the activity to the gradebook, and make them visible to participants in the activity.
Setup Phase

In the Setup phase, you will be preparing everything necessary for participants to submit their assignment to the workshop. To advance to the next phase where participants will be submitting their work, there are four steps listed in the checklist, some of which may have been completed during the initial setup of the workshop. (Note: not all steps are required).
- Set the workshop description
- Provide instructions for submission
- Edit assessment form
- Switch to the next phase
Set the Workshop Description
If you did not enter an overall Description for the workshop during the creation of the activity, clicking on Set the workshop description will take you to the workshop settings page, where you can add or edit the description.
Submission Instructions
Similarly, if you did not enter a Description of the submission instructions during the creation of the workshop, clicking Provide instructions for submission will take you to the settings page to do so.
Creating the Assessment Form
The next item in the list is to Edit assessment form. Depending on the type of grading chosen, you will see a slightly different set of options, as shown below. Each of the four types listed below will allow you to create a number of aspects/assertions/criteria and the values for each.
- Accumulative grading
- Comments
- Number of errors
- Rubric
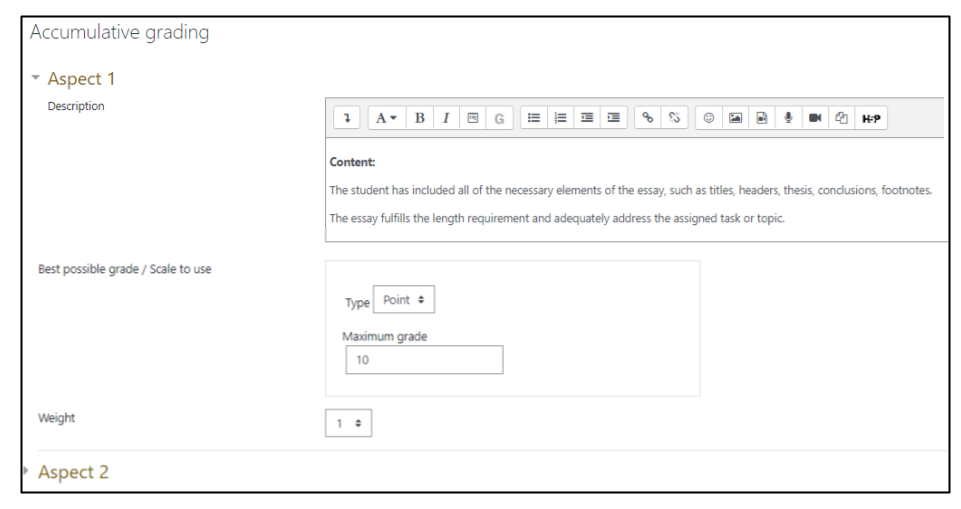
Accumulative grading
With Accumulative grading you create a number of Aspects with a grade and a weight that are then added together and averaged, following these steps:
- Enter a Description for the Aspect detailing what is being assessed.
- Choose the grade Type - you may choose Scale or Point (or none). Each Aspect may have its own grade type (i.e. you may mix scale and point aspects).
- Enter the Maximum grade (for Point) or Scale type (for Scale).
- Choose the Weight for this Aspect. Values may be chosen from 0 to 16. This is the factor this Aspect will be multiplied by (i.e. a weight of 2 counts twice and a weight of one counts once).
- Enter information for additional Aspects. If you need more than three Aspects, click on Blanks for 2 more aspects.
- At any point you can choose to Save and continue editing to save your work, Save and preview to see what your form looks like, or Save and close to complete the assessment form.
Comments
Comments provides the ability to give feedback to pre-defined Aspects, but does not give a grade. Follow these steps to create your form:
- For each Aspect, provide a Description of what part of the assignment the comment pertains to.
- If you need more than three Aspects, click on Blanks for 2 more aspects.
- At any point you can choose to Save and continue editing to save your work, Save and preview to see what your form looks like, or Save and close to complete the assessment form.

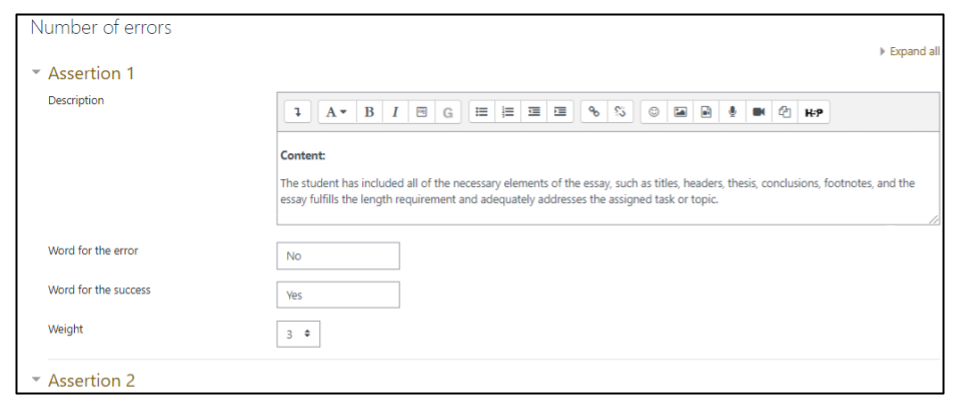
Number of Errors
To set up assessment using Number of errors, you need to specify a number of Assertions, the designations for success and error, and the weight for each. Follow these steps to create your form:
- Enter a Description for the first Assertion that will be assessed as achieved or not achieved.
- Next, type in the Word for the error, such as "No," "Missing," "Incomplete," etc.
- Then add the Word for the success, such as "Yes," "Present," "Complete," etc.
- Finally, add the Weight for this Assertion. Values may be chosen from 0 to 16. This is the factor this Aspect will be multiplied by (i.e. a weight of 2 counts twice and a weight of one counts once).
- Enter information for additional Assertions. If you need more than three Assertions, click on Blanks for 2 more assertions.
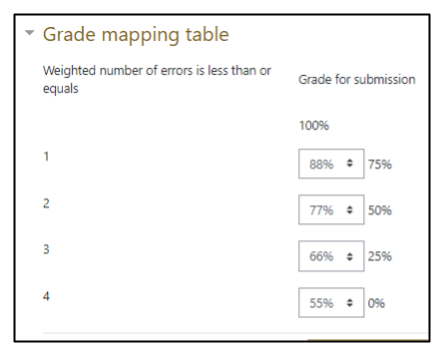
- Once you have completed entering your Assertions, click Save and continue, or Save and preview (and then Back to editing form) and then expand the Grade mapping table. The table will automatically suggest a percentage for each of the weighted error points possible (from 1 to the sum of weights from all the Assertions), with each weighted error point subtracting 1/total from a perfect score. (So, if the sum of weights is 5, then each weighted error point will subtract 1/5 or 20% off the grade). You copy over these suggested values, or enter your own in the fields to the left of them. If a field is left blank, a score pertaining to that field will get the next highest percentage entered (i.e., if a participant receives 3 weighted error points, and that value is empty, and the value for 2 is 70%, they will receive a 70%).
- At any point you can choose to Save and continue editing to save your work, Save and preview to see what your form looks like, or Save and close to complete the assessment form.
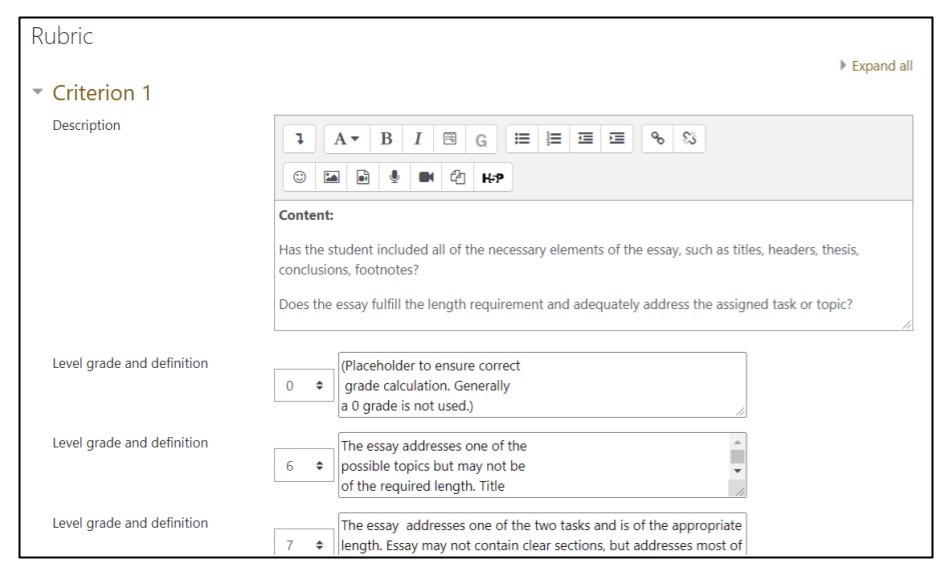
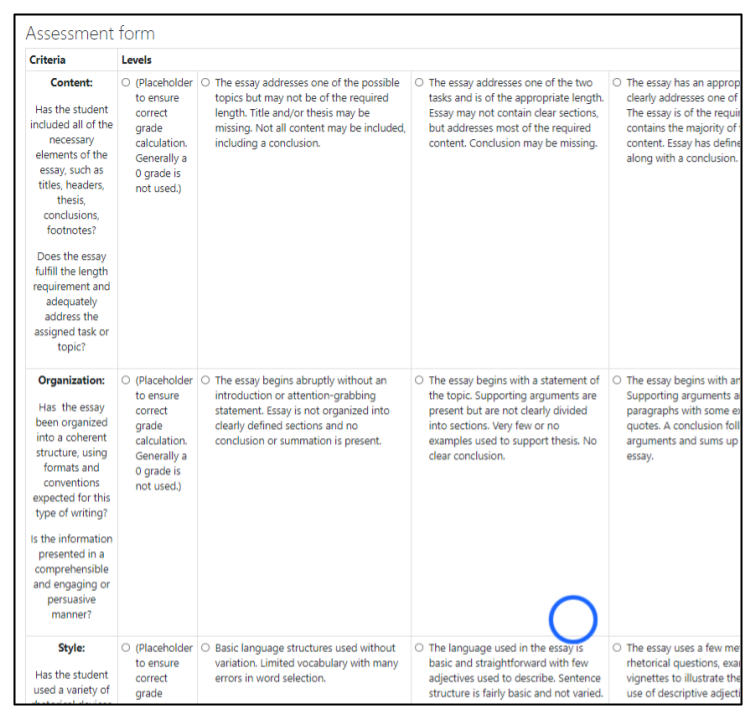
Rubric
For a Rubric you may create any number of criteria, with any number of levels/definitions. Follow these steps to create your form:
- Begin by entering a Description of the Criterion to be assessed.
- Then begin assigning each Level grade and definition. Remember that it is recommended to begin with a 0 grade (the definition for this can be left blank). Level grades need not be consecutive, and can jump from 0 to, say, 6 as in the example below. Initially, there are 4 level grades available. To enter more level grades, fill out the first four and then select Save and continue editing at the bottom of the page. When the page refreshes, two new level grades will be added to each 'filled' criteria.
- The rubric has a default of 3 criteria, and additional criteria can be added by clicking on Blanks for 2 more criteria.
- When all criteria have been filled out, you may choose under Rubric configuration whether the rubric should be displayed in a Grid or List (see examples below).
- At any point you can choose to Save and continue editing to save your work or create extra level grades, Save and preview to see what your rubric looks like, or Save and close to complete the rubric.
| Grid example: |
List example: |
 |
 |
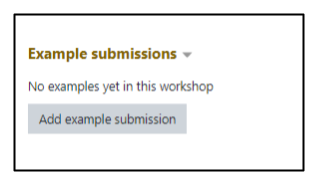
Add Example Submission (Optional)
If you indicated in the workshop creation that you wanted to provide an example submission for participants to asses, you will need to upload at least one submission during the Setup phase of the workshop. To do so, click on Add example submission under Example submissions.
On the next page, enter a Title for the submission and optional text for the Submission content. You may also, or alternatively, submit an Attachment by dragging a file to the attachment box or choosing a file with the file picker.
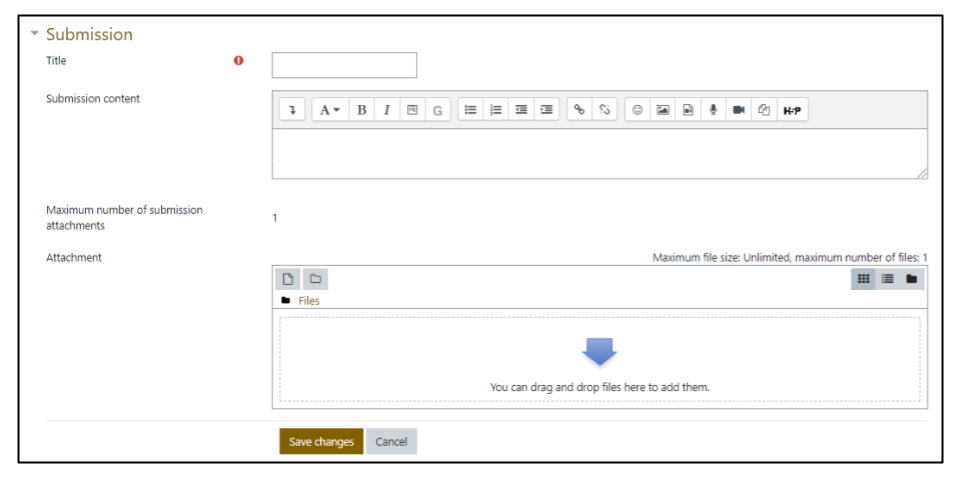
Once you have entered your example text and/or uploaded your example attachment, click Save changes.You will then see a screen informing you that you will need to provide an assessment for this example submission. You can click on Continue to proceed directly to the assessment form, or Cancel if you wish to do the assessment at a later time. This is also the same screen that you will see if you click on the name of the submission (under Example submission on the main Setup phase page). This page allows you to remove the submission if you want to replace it, and includes links to both Assess and Edit the submission (which can also be accomplished from the Setup phase page via an Assess button and the pencil icon next to the submission). You may upload (and assess) additional submissions by clicking on the Add submission button.

Assessing the Example Submission
Assessing the example submission can be triggered three ways: directly after creating the submission, by clicking on the title of the submission and then clicking Assess example submission, or by clicking on the Assess button below the submission title. Depending on the type of grading you chose, the assessment form will look different. Each of the assessment types allows for Overall feedback (if turned on in the workshop creation) along with possible feedback for each section of the assessment. Once you have completed the assessment, you will see the sample assessment score listed under the assessment title. This score will reflect the percentage given by the assessment multiplied times the number of points allocated to the submission portion of the workshop during the initial grade setup process (e.g. if the submission portion is worth 70 points, and the assessment is 80%, the score will be 56/70).
Once the Setup phase requirements and optional elements have been set up, clicking on Switch to the next phase in the phase steps listed under Setup Phase will advance the workshop to the Submission phase and allow for submissions to be uploaded and example assessments to be completed, once any optional Availability or Restriction conditions (as indicated on the workshop settings page) have been met.
Continue to the Submission phase.