St. Olaf has created an Addin to RStudio that allows instructors to create their own course folders and manage their student access. This Addin is an R package that installs a Shiny app that runs in a separate browser window. Using this Shiny app you can set up a course folder with private folders for instructors, read-only folders for sharing files to students, shared folders for student project work, and individual student folders.
Once the course folder has been created, you can control participant access by adding or removing users as students, teaching assistants, or instructors. The instructions below detail how to set up and manage both a single section course as well as a multisection course with shared resources. Use the shortcuts below to jump to the appropriate section, or to view a video walk-through for the two different types of courses.
Accessing the RStudio Course Management System
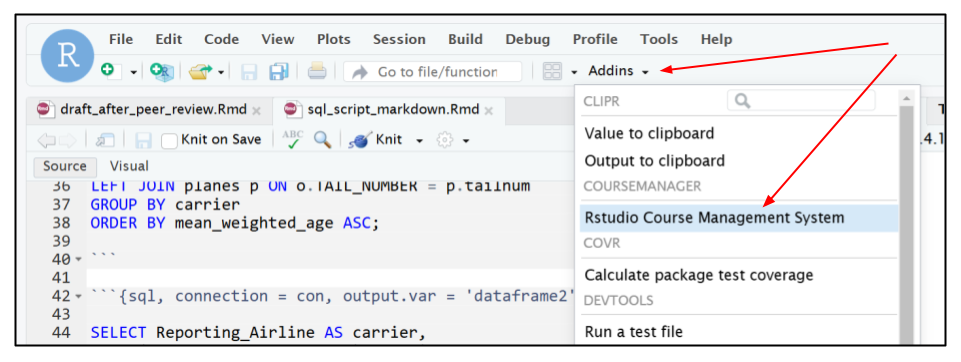
- After logging in to the RStudio server, click on the Addins menu item drop-down menu, found at the end of the second line, below the main application menu.
- From this drop-down menu click on RStudio Course Management System (RCMS) underneath the COURSEMANAGER label.
- A new browser window will open with the RCMS interface.
Creating a course directory
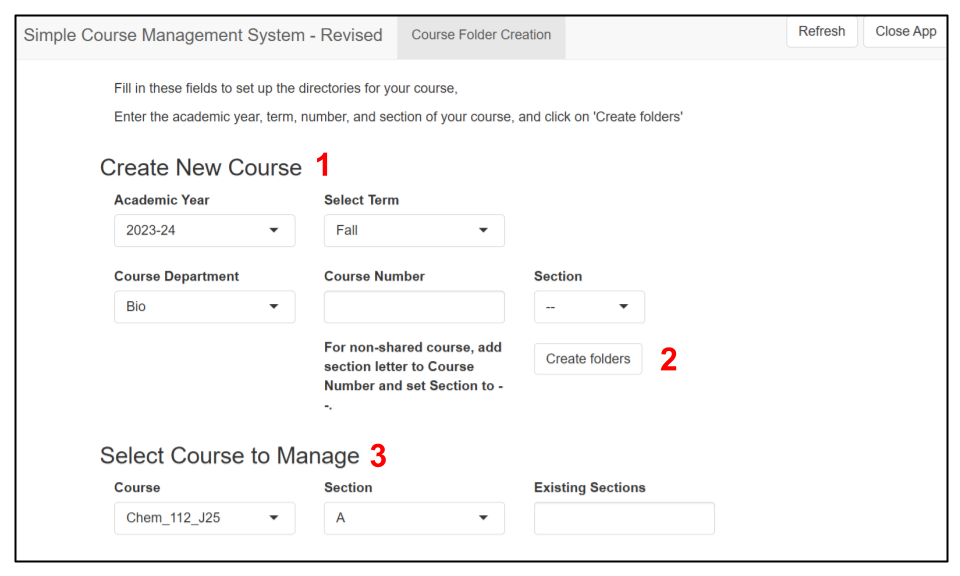
- Under Create New Course [1], choose the appropriate values from the Academic Year, Select Term, and Course Department drop-down lists - these values will be used to appropriately name your course. If you don't see you department listed in the Course Department drop-down, please notify iTech, and we will make sure to add it to the list.
- Add your Course Number in the text box
- Leave Section set at -- .For a non-shared section of a multisection course, add your course letter to the Course Number, ie 123B.
- If you are creating one section of a shared, multisection course, select your Section letter from the drop-down list.
- Verify all of your information and click on the Create folders button [2].
- Your new course will now appear below under Select Course to Manage [3].
Adding students and TAs to your course
- Under Select Course to Manage [3], choose your Course, and Section from the drop-down lists, if it's not already there.
- The appropriate participant list buttons will then become active. (For sections in which you are the lead teacher, you will be able to add students, teacher and TAs. For new sections in a multisection course, or sections where you have added a teacher but no one has taken ownership of the section, you can add teachers. For sections that have a lead teacher, you cannot add any participants.)
- Paste (from Moodle*) or type in the username(s) (ie, johnso34) of the participant(s) into the appropriate text box (in addition to any already there) - separated by a space or a line return (no commas or semicolons) and then click on Add/Update student/TA list. The list in the box when you submit should be the full current list.
- A confirmation dialog will appear indicating successfully added participants, as well as any errors that occurred, such as a participant not being found as a valid user. In this case, check your spelling, and notify iTech if the name appears to be spelled correctly, but still won't add. *When adding participants after content has been added to the course, you may see a notice that certain content added by others may not be accessible to the user(s) you just added.
*Note: The best way to maintain a current student list is to go to your Moodle course, select Roster and then click on View usernames, and selecting Username from the top to list just the usernames of all participants in the course. Copying this list to the RCMS to update your enrollment will both add new users and remove those who have withdrawn from the course.
Adding sections to a multisection course
For courses with multiple sections that are sharing course materials, one instructor will create the course as detailed above, and then add additional sections/instructors. This also applies if you are teaching multiple sections of a shared multisection course, or a course where you you are teaching multiple sections and wish to keep the student groups separate. The course creator is able to add and remove teachers to other sections, but is not able to add students or TAs to these sections (unless they added themselves as lead teacher).
Note: If a teacher has been added to a new section, but hasn't logged in and 'claimed' that course, the course creator can simply remove them and add a new teacher. However, if the section teacher has claimed that section, the course creator can remove them, but access to manage section participants will be lost, although links to this 'orphaned' course will be placed in the course creator's folder upon section teacher removal (this would be in the rare case that an instructor needs to be removed from a course and denied further access. In the case where another instructor is simply taking over a section, the current section owner could just add them as an additional instructor).
- Under Select Course to Manage [3] choose your course from the Course drop-down menu.
- Choose the appropriate new Section for this teacher (you will not be able to add teachers to courses you do not 'own').
- Enter the user name(s) (ie, johnso34) of the teachers to be added in the text box under Teacher.
- Click on Add/Update teacher list.
- You will see a confirmation message indicating success (or reason for failure).
- The added teacher can now open the RCMS Addin to have links created and manage participants in that course.
Adding other teachers to a course
Adding to your section
Additional instructors may be added to a single section course or to a section in a multisection course, and they will have the same abilities in that course/section, except that they will not be able to manage course participants. They will have access to read and write to all the course folders, with the exception that there will be one shared Prof folder, and each instructor will also have an individual Prof folder as well.
- Under Select Course to Manage [3] choose your course from the Course drop-down menu.
- If you are the teacher of multiple sections in a course, verify that the appropriate Section is chosen.
- Enter the user name(s) (ie, johnso34) of the teachers to be added in the text box under Teacher - multiple names can be entered, separated by a space or a return.
- Click on Add/Update teacher list.
- You will see a confirmation message indicating success (or reason for failure).
Removing participants from the course
Under Select Course to Manage [3], choose your Course, and Section from the drop-down lists, if it's not already there.
- The appropriate participant list buttons will then become active. (For sections in which you are the lead teacher, you will be able to manage students, teacher and TAs. For new sections in a multisection course, or sections where you have added a teacher but no one has taken ownership of the section, you can manage teachers. For sections that have another lead teacher, you cannot alter any participants.)
*Note: you cannot remove yourself from (all sections of) a course, and if you remove the lead teacher of another section, you will have links to that section's folders put into your shortcuts, but you will not be able to manage that section's participants.
- Delete the username(s) of the participant(s) from the appropriate text box and then click on Add/Update student/teacher/TA list.
- A confirmation dialog will appear stating that the user has been removed from the course.
Locking a multisection course
Removing a student from the course will block them from using the shortcuts placed in their R home directory to access the shared content in the Class folder of the course directory. However, in order for the RCMS to allow additional instructors in a multisection course to provide access to the Class folder to their students, it is necessary for the Class folder to be technically open/readable to any user on the system. In order to view files there, they would have to discover the full directory name of the course, and navigate to that path on the server - very unlikely, but still possible.
To prevent access to that folder from anyone not enrolled in the RCMS as student, teacher or TA, the course owner/original creator can click on the Lock course button (under the Existing sections text box) to grant specific access to those enrolled, and locking all others out. Once this has been done, teachers in other sections will no longer be able to add students/TAs, as they would not have access to the Class folder. However, this action is reversible, by simply clicking on the button again (which will now read Unlock course) to open the course back up. Once the participant has been added, the course owner can re-lock the course.
Video walk-through of course locking