Digital Olaf (formerly Elevator) is a media repository that allows for the secure sharing of videos, images and texts, making unauthorized downloading and use of the content difficult. Media hosted on the Digital Olaf site can easily be shared through Moodle, giving participants in the course automatic access, anywhere Moodle shows you a text editor.
Inserting a Digital Olaf asset into Moodle
A Digital Olaf asset can be inserted anywhere Moodle has a text editor, such as a Label, a Moodle Page, or in the Description field of any activity. If the asset isn't connected to an activity like a Forum or Assignment, and is being inserted as a standalone resource, it is recommended to insert it by adding a Moodle Page. Whereas a Label will add the asset directly into the flow of the main Moodle page (which could be acceptable if it isn't very large), a Page will show up as a link, opening in a separate page - which will appear in a pop-up window in the Tiles format. Regardless of the activity type chosen, the steps to insert the asset using the text editor are the same wherever you choose to insert it.
- Create or open an acitvity, such as a Moodle Page or Label
- In the text editor, click on the add an image icon - this pertains to all types of Elevator assets: images, videos, and pdf files.

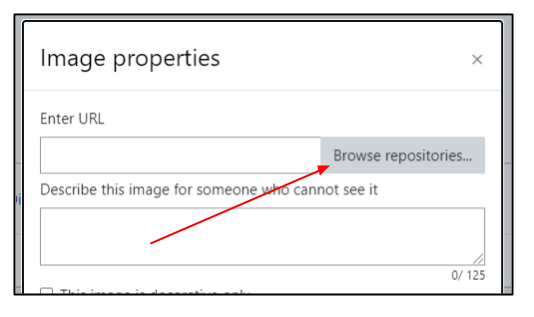
- Click on Browse repositories... next to the field for Enter URL

- From the left side File picker menu, click on St. Olaf Elevator. If you are not currently logged in to Elevator, you will see a button to the righ to Log in to your account

- Click on Collections and navigate to your chosen folder/collection and select the asset you wish to insert
- Click on Select this file
- Add descriptive text under Describe this image for someone who cannot see it and select Save image
- Save the activity