Body
If you often work in a non-English language, it may be convenient to be able to switch your keyboard layout to type that language, as opposed to having to individually inserting special characters where necessary. This article explains how to add a non-English keyboard to your Apple or PC computer, and how to switch between the available keyboards. Use the links below to jump to the desired information.
Languages in Windows
Adding a language in Windows
To add a language to your Windows PC, use the following steps:
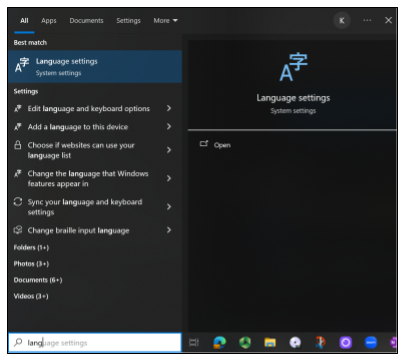
- Click on your Search bar or magnifying glass and type "Lang"
- From the pop-up menu, click on "Language Settings"

- On the Language settings page that opens up, go to the section titled Preferred languages, and click on Add a language.

- Type the name of the language into the search bar, or scroll through the list to find the desired language. Note: Many languages will have several regional or dialectal options to choose from. Choose your desired language and click Next
- Icons next to the language will indicate if the following are installed (basic keyboard support is often available when no icons appear):
- The language pack
- Speech-to-text
- Speech recognition
- Handwriting recognition
- Basic typing with spellchecking and dictionaries

- Your chosen language is now installed and will appear at the bottom of your Preferred languages list. In Windows 10 you will see the icons next to the language, in Windows 11 you will see text indicating available support for that language below it.

Switching between languages in Windows
Once you have multiple languages installed in Windows, you will see an abbreviation on your taskbar indicating the current language. To switch your input language, do one of the following:
- Click on the language abbreviation to bring up the language pop-up menu and select the new language

- Press the Windows key (⊞) and the spacebar (repeatedly) until the desired language is highlighted, and then release the Windows key
Languages in macOS
Adding a language in macOS
To add a language to your macOS system, do the following:
- Click on the Apple icon in your main menu on the top left

- Select System Preferences... from the menu

- Click on the Keyboard preferences item

- Select the Input Sources tab

- From the bottom left, click on the plus (+) to add a language

- Select your desired language from the list on the left, and then choose the desired layout (if there are mutiple options) and click on Add

- Your newly added language will now appear in the list on the left

Switching between languages in macOS
Once you have multiple languages installed in macOS, you will see a flag on your menu bar indicating the current language. To switch your input language, do one of the following:
- Click on the flag icon to bring up the language pop-up menu and select the new language

- Press the command key (⌘) and the spacebar (repeatedly) until the desired language is highlighted, and then release the command key